A Hitchhiker's Guide to Github
This tutorial is designed for people who are having a tough time transitioning to GitHub. Specifically, you tried to understand it by talking with people who know what they are talking about, but then they just confused you with a bunch of GitHub jargon you aren't familiar with. This really annoyed me, and it was tough for me to figure it all out... but now I feel like I can now teach people who used to be in my shoes.
Prequel
As a prequel to this tutorial I'd like to tell you about myself. I tend not to be someone who like to change to way I do things unless it is really necessary. Particularly, this was a big issue when it came to GitHub. In your classes your professors are always like: "omg yeah use git" (in a much more doctoral verbiage), but if you are anything like me, you'd be thinking something along the lines of: "nah fam, im gud". This was because I felt more accustomed to my own way of version control.
My Old Method:
Why My Old Method sucks:
Convincing you why you should use GitHub
Prequel
As a prequel to this tutorial I'd like to tell you about myself. I tend not to be someone who like to change to way I do things unless it is really necessary. Particularly, this was a big issue when it came to GitHub. In your classes your professors are always like: "omg yeah use git" (in a much more doctoral verbiage), but if you are anything like me, you'd be thinking something along the lines of: "nah fam, im gud". This was because I felt more accustomed to my own way of version control.
My Old Method:
- Modify code
- Compress the code into a Zip File named: "<Project>_RevX.zip"
- Send the file over whatever form of file transfer you and your team worked with (WhatsApp, Messenger, Email, ect)
Why My Old Method sucks:
- Trying to work in parallel with other people is super difficult, it requires both parties to finish and then send one person your revisions and they have the job of figuring out what you changed and pasting your code into their version (generally they missed something... lots of bugs.. *sad face*)
- If you try to be more risky with the changes you make and it has been a while since you made your last zip file... big yikes it will be hard to Ctrl-Z all the way back to where you feel more comfortable working from.
- Too many Zipfiles, if I showed you my Desktop in my old days you would barf :(
Convincing you why you should use GitHub
- It is the undisputed programming standard for coding
- Version Control is king when trying to develop projects, and GitHub handles not only your stuff but other people's stuff, and best of all like I said before GitHub automates that process of combining you and your partner's code
- Collaboration is made easy with Github since there are so many way for you to indicate to others what you have done, and tell others what they should do
- JUST MAKE THE CHANGE BRUH, IT WILL CHANGE YOUR CODING LIFE :)
Understanding GitHub
A critical part to understanding GitHub is understand how it works "under the hood", this will help us understand all that weird lingo.
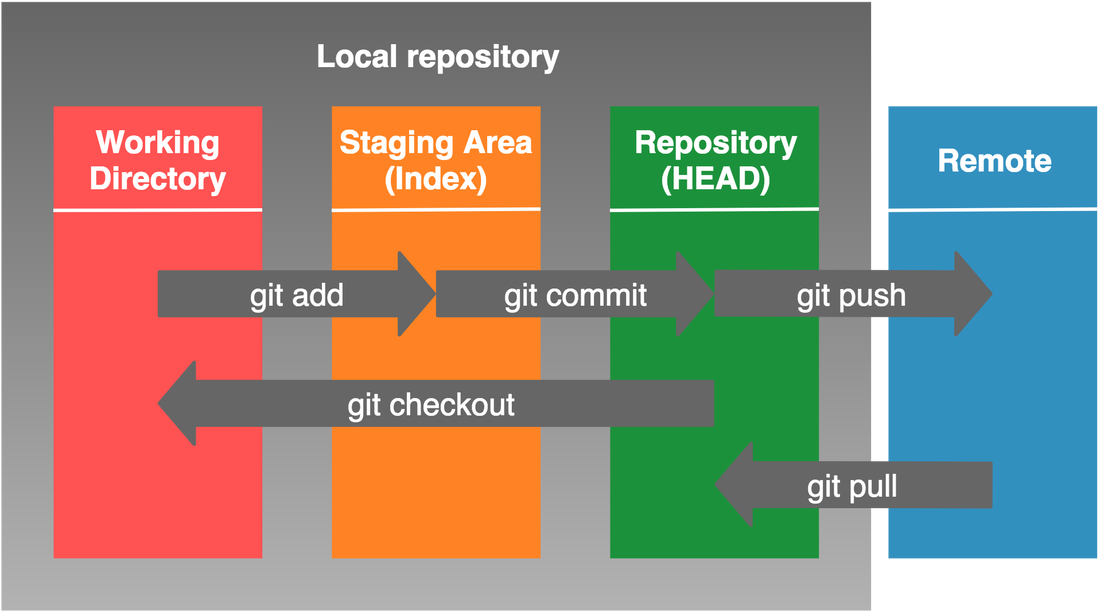
When working with GitHub there are two places where your files will exist:
All throughout this tutorial we will first start by setting up a remote repository in GitHub, downloading it's contents, modify the contents on our local side, and finally upload our changes to the remote side. This is basically what typical GitHub use looks like.
A critical part to understanding GitHub is understand how it works "under the hood", this will help us understand all that weird lingo.
When working with GitHub there are two places where your files will exist:
- Local Repository- These are the files that are physically on your computer's file system
- Remote Repository- These are the files that exist on GitHub's servers
All throughout this tutorial we will first start by setting up a remote repository in GitHub, downloading it's contents, modify the contents on our local side, and finally upload our changes to the remote side. This is basically what typical GitHub use looks like.
Step #1: Downloads
If you haven't already, you will want to make a GitHub account at this link here: GitHub
Next, I recommend you download GitBash, this is a helpful Desktop terminal that allows you to directly interface with GitHub and the files on your computer without the need of opening up your web browser every time. You can download that here: GitBash
Step #2: Linking GitHub and GitBash
Okay, now that you have both those things downloaded we are gonna make things easier for you so you don't have to type your user name and password every time we enter specific git commands. The way we solve this issue is by linking your GitBash to your GitHub account. We do this by having GitBash generate a unique SSH key and typing it into our GitHub account.
Start by Opening GitBash, and typing the following command:

GitHub is about to create an SSH key into a file and it is wondering where to save it, you can just use the default location, hit <ENTER>.

GitHub is now asking if you want to assign the SSH key it is about to create a specific name. We don't really care since we will only be using it once. Just hit <ENTER>.
It is going to ask you to confirm the paraphrase, just hit <ENTER> again.
The file has now been create in that location specified above:
It is going to ask you to confirm the paraphrase, just hit <ENTER> again.
The file has now been create in that location specified above:
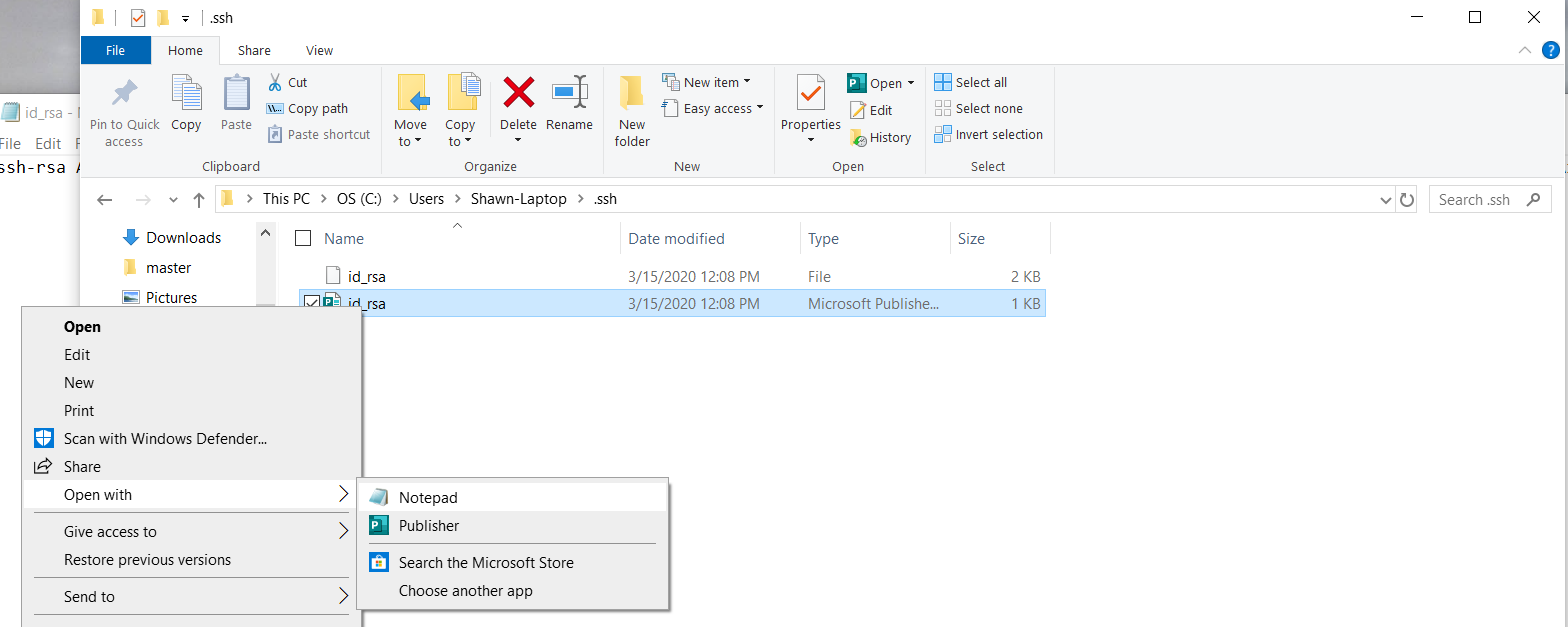
Open up the first "id_rsa" in NotePad and Copy the contents

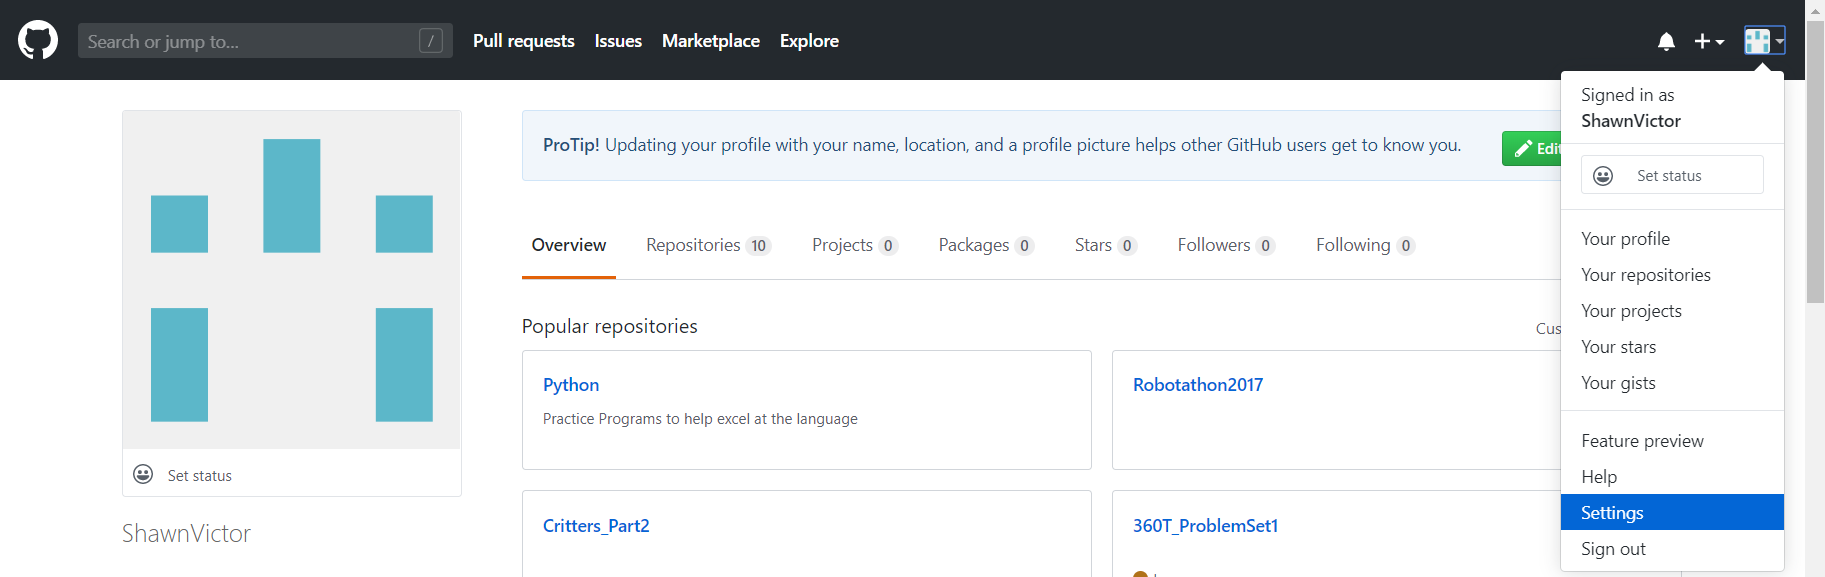
Now go to GitHub and go to your settings:
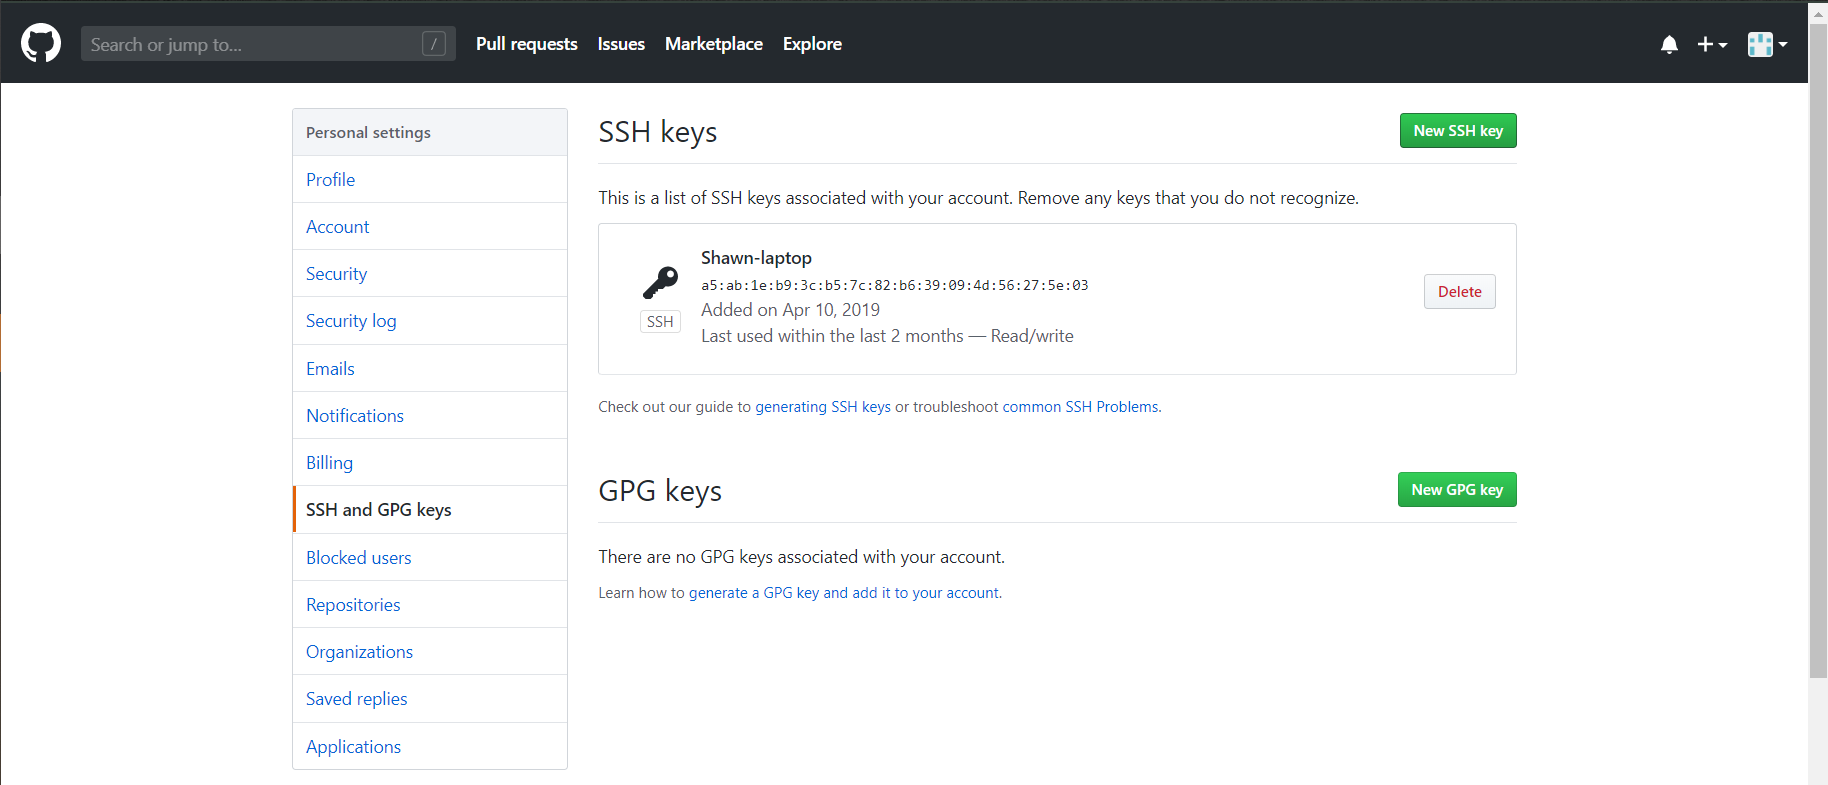
On the Left Menu Bar, select "SSH and GPG keys" and hit the green "New SSH key" button
Enter a nickname for your computer, as well as the copied SHH key:
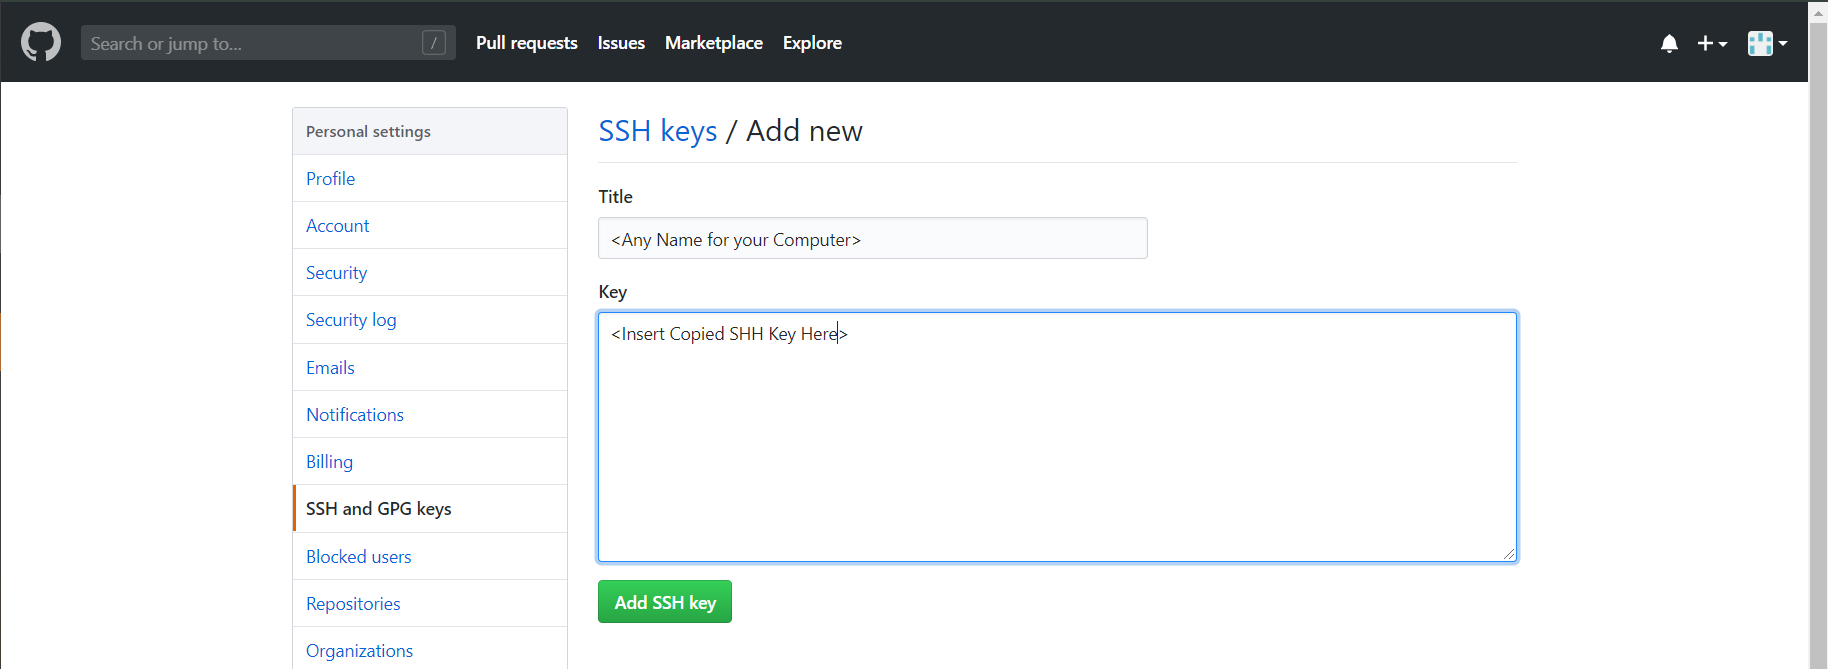
Simply Hit "Add SSH key", and you are all set! Now you will be able to use the clone and push commands without having to type sign in credentials every time!
Step #3: Understanding the GitHub workflow
Alright, now we are ready to start talking about how to actually use GitHub and some basic commands.
So you will either begin in one of three scenarios:
We will start with Scenario #1 which will eventually lead into Scenario #2. Scenario #3 we will talk about last. If you are at Scenario #2 or #3, just skip below :)
Scenario #1: Creating a GitHub Repository:
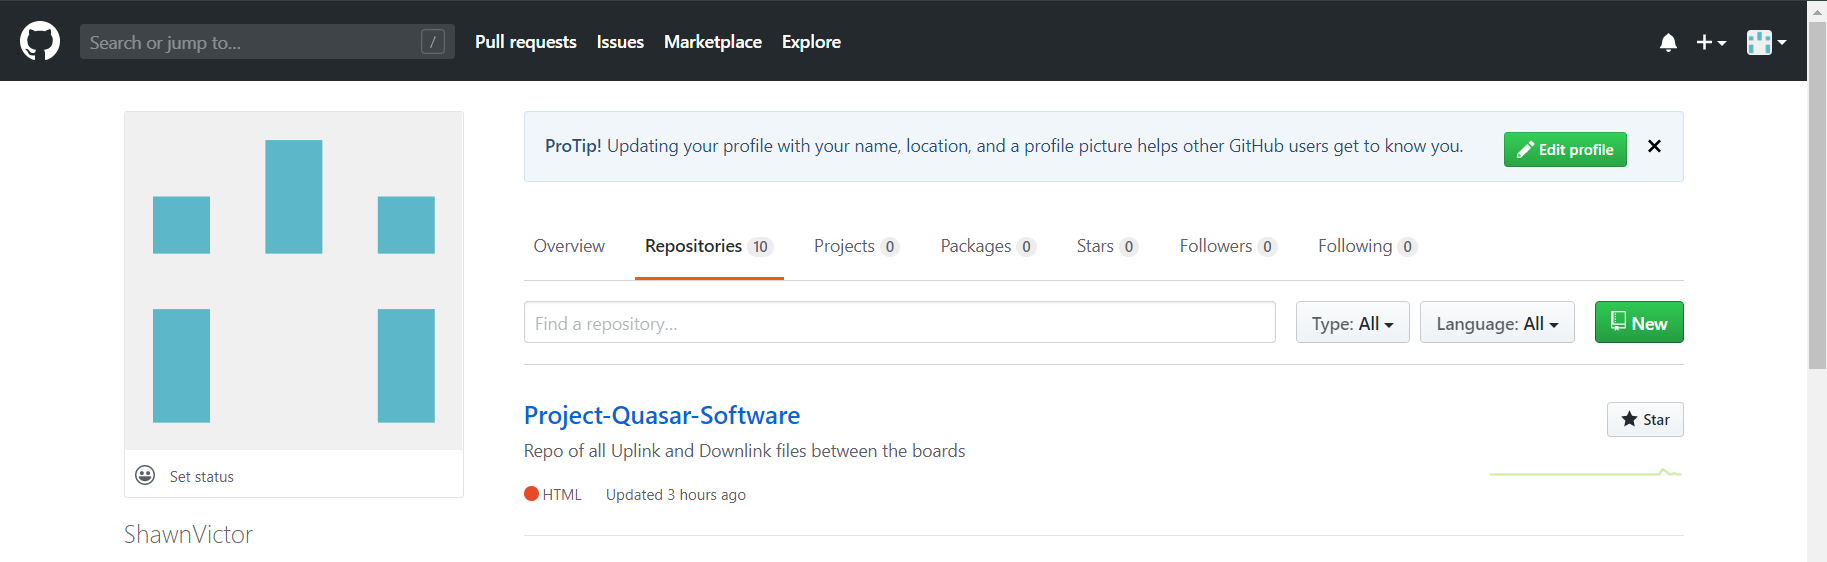
Start by going to your GitHub main page, select the tab "Repositories", and select the green "New"
Alright, now we are ready to start talking about how to actually use GitHub and some basic commands.
So you will either begin in one of three scenarios:
- I don't currently have a repository to store my code, so I need to make one...
- Someone already created a repository and I am collaborating with them on the code, now I need to link it to my GitHub...
- Someone has existing code on a repository, I am not collaborating with them, but want to start developing on top of their code...
We will start with Scenario #1 which will eventually lead into Scenario #2. Scenario #3 we will talk about last. If you are at Scenario #2 or #3, just skip below :)
Scenario #1: Creating a GitHub Repository:
Start by going to your GitHub main page, select the tab "Repositories", and select the green "New"
Fill in the following information:
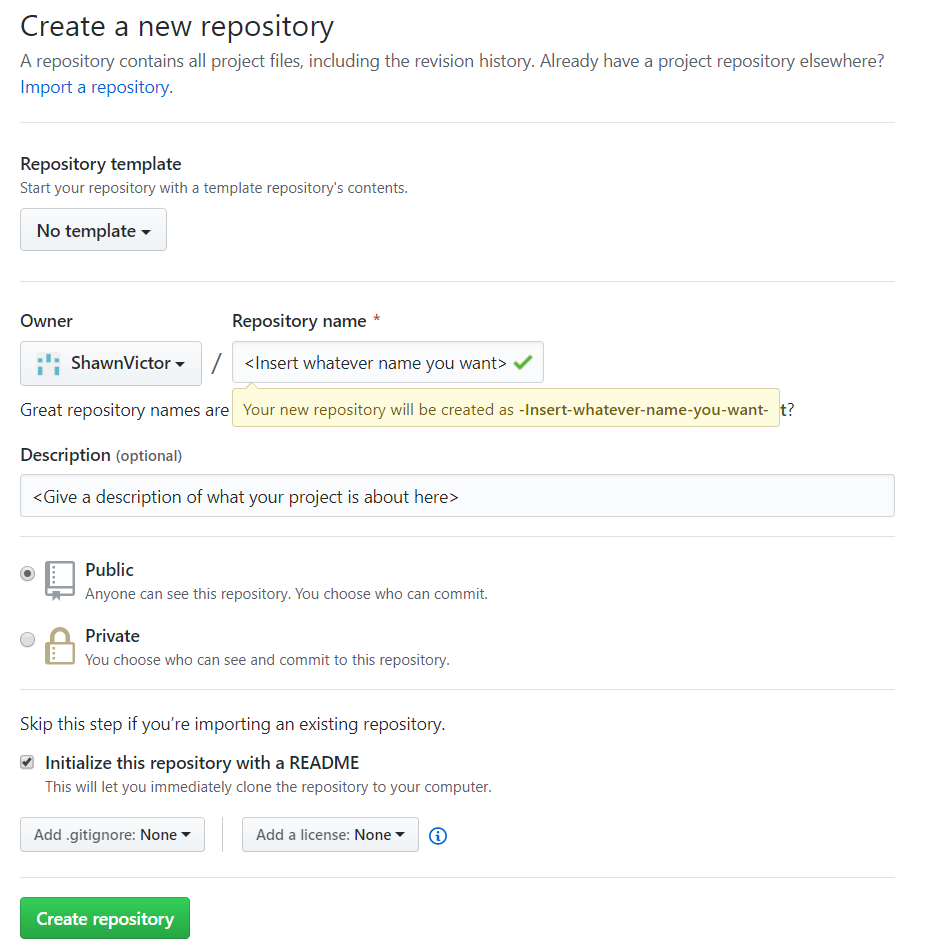
Once completed, select the green "Create Repository" button.
Ok Now we are where Scenario #1 and Scenario #2 Merge.
Scenario #2: Cloning a Repository
Ok, we use this term "cloning" to simply indicate we are taking an existing remote repository, and copying all the contents to our local repository on our computer.
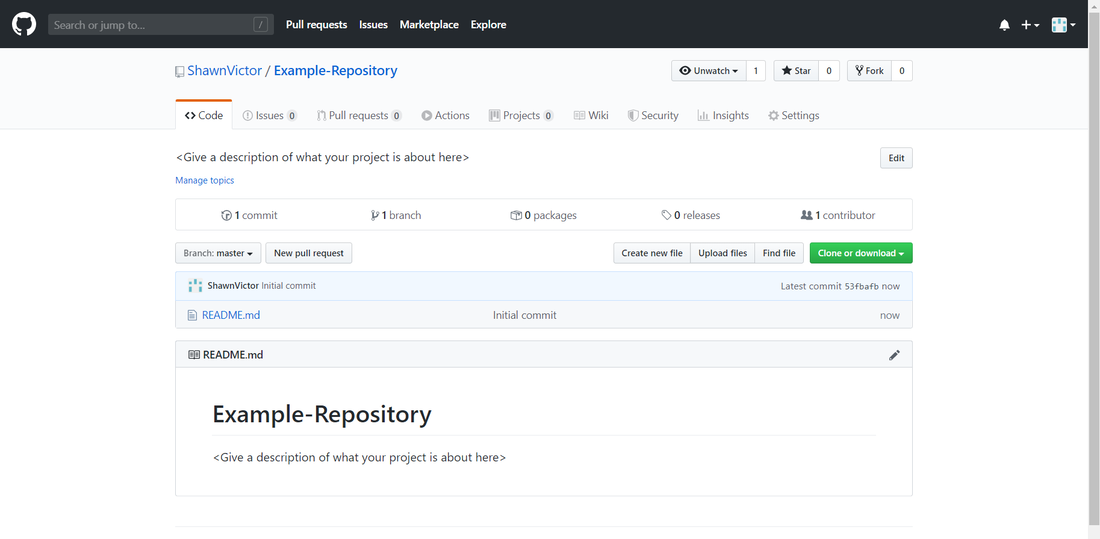
When at an existing repository your screen should look like this
Ok Now we are where Scenario #1 and Scenario #2 Merge.
Scenario #2: Cloning a Repository
Ok, we use this term "cloning" to simply indicate we are taking an existing remote repository, and copying all the contents to our local repository on our computer.
When at an existing repository your screen should look like this
If you are Scenario #3, at this point you can simply hit the "Fork" button at the top Right corner of the screen. This will bring you to a duplicate screen of the repository except this one is a copied version that now exists on your GitHub account. You can continue just as if you are in Scenario #2.
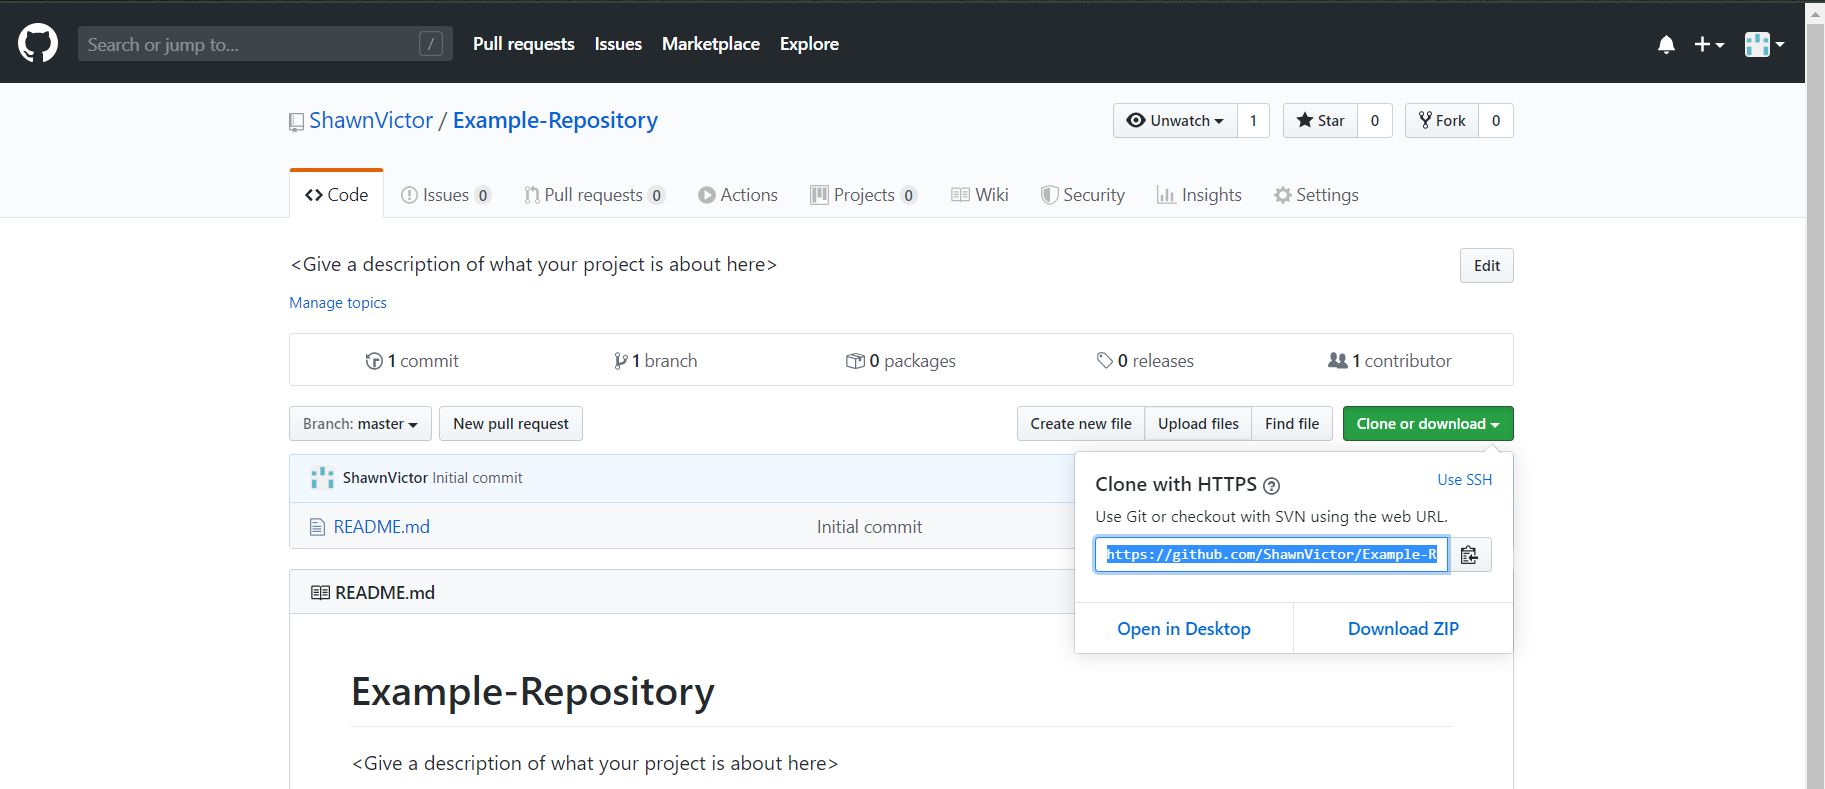
Now we need to hit the green "Clone or download" button and copy the link listed:
Now we need to hit the green "Clone or download" button and copy the link listed:
Now using the File Explorer, find the location where you want your local repository folder to be. Right click over the white area of your file explorer, and Select "Git Bash Here"
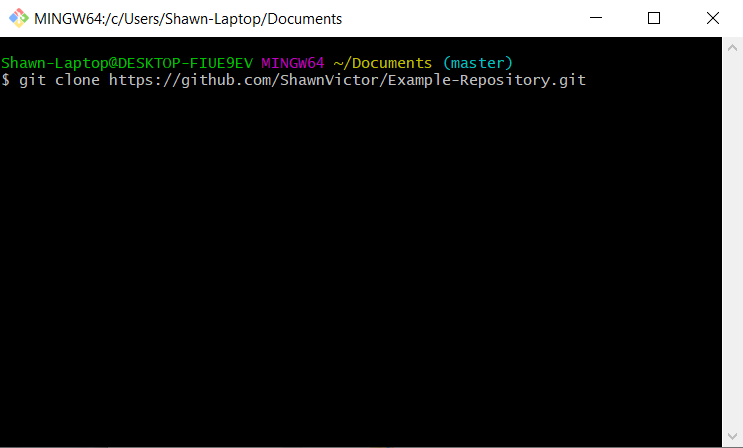
You will now type the following command replacing the <INSERT COPIED URL> with your actual URL: git clone <INSERT COPIED URL>
Now that we have clone the remote repository to our local repository, we can now use a simple bash command to change our current directory to the one we just cloned:

Okay, now that we have cloned the repository, we can move into actually making file modifications.
Step #4: Understanding Branches
Now that you have the repository cloned, you can go off and make the changes to the files inside the folder. But it is important to note that the current files you have are from the remote repository's master branch. We will be using the term "branch" quite frequently, so it's important to know what it means. A branch is simply a development point in your code, this will make more sense as I explain this:
Now that you have the repository cloned, you can go off and make the changes to the files inside the folder. But it is important to note that the current files you have are from the remote repository's master branch. We will be using the term "branch" quite frequently, so it's important to know what it means. A branch is simply a development point in your code, this will make more sense as I explain this:
- Your GitHub, lifeline is made up of a series of commits (commits are simply changes you have declared)
- All commits have a unique ID given to them
- master is a pointer that can indicate whichever commit you want
- The first node created in a repository is the origin node, master will initially point to the origin
- HEAD is another pointer which points to the latest commit in your local repository
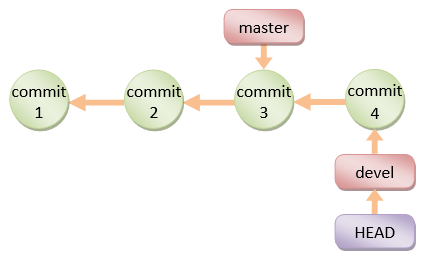
- As you are ready to start developing on your own, or developing a major feature of code, you will generally create a new branch
- The branch simply points at a commit
- Generally, you want master to be pointing at the commit with the most functional version of your code
- When you are ready to combine, we will merge your branch into master

To create a new branch we will use the following command: git checkout -b <INSERT BRANCH NAME>

Now you can start your development in your own branch.
Sometimes you will want to checkout other people's branches and look at their code. To do this simply type the following:
git checkout <INSERT BRANCH NAME>
To start using their code you can use the follow command:
git pull
If you are thrown with an error, it is likely because you currently have made changes to your local files and have not commited your changes (we will talk about this in the next section), you can type the following command to save your changes in a copy stack:
git stash
When you are ready to go back to your old code, just type:
git stash pop
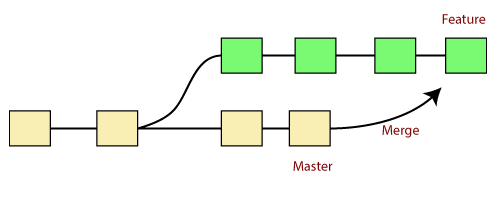
Step #5: Learning to add/commit/push
This is probably the most confusing parts about GitHub. These are all commands used to save the changes you make to your local files and send them over to the remote repository. Take a look at the image below:
This is probably the most confusing parts about GitHub. These are all commands used to save the changes you make to your local files and send them over to the remote repository. Take a look at the image below:
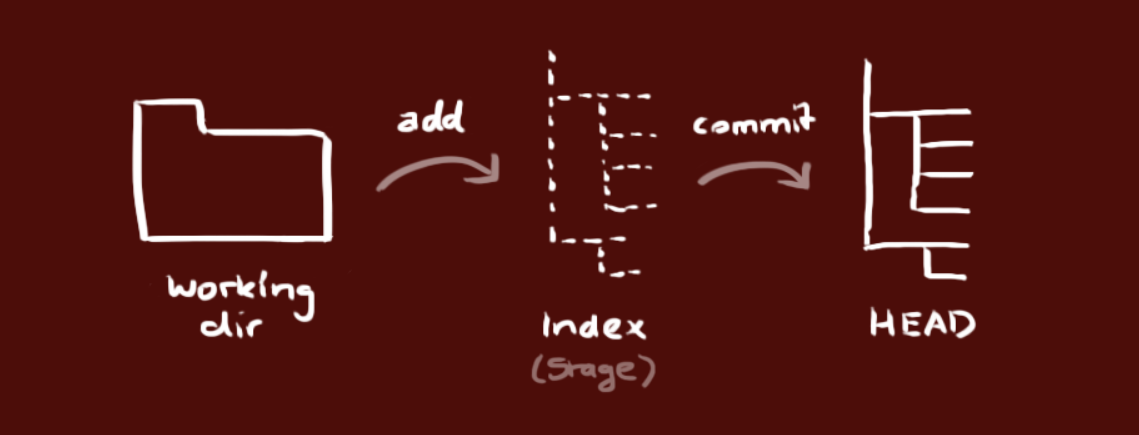
The working dir(directory) is your local repository folder. To understand this well we gotta go back a bit to Branches. Each branch is made up of a series of commits. These series of commits have a pointer known as the Head. The Head points at the latest commit in your local repository, so you can make multiple commits and the head will move forward from one commit to the next, but each commit is linked to the next one in case you ever want to revert back to an old commit. Okay, now that we understand commits we gotta understand the purpose of the add command. Commits are made up of a series of changed files which we call the Stage, the process of adding in all of the modified files is known as the Staging process.
Let's say you just finished making modifications to the file A.txt and you are ready to add these changes to a commit node. You first need to stage all your changes. Now some people will simply add all files to the stage, but it is better practice to only add the files that you modified since your last commit. The way you do this is with the following command:
git add <INSERT FILE/FOLDER NAME>
If you want a shortcut to adding all the files in your local repo into the staging area (not recommended, but frequently done since it is easier to type than the whole file/folder name of each modified file):
git add -A
Once you have added all of your changes you should first run this command to see if there are any files you made changes to and did not add to the staging area (known as untracked files).
git status
If there were any untracked files, simply add them as well.
Okay once we have our Stage set up properly, we are ready to physically create the commit node. Use the following command
git commit -m "<INSERT MESSAGE INDICATING WHAT WAS DONE IN THIS COMMIT.>"
You can continue to create as many commits as you want as you make changes, but when you are ready to update the remote repository with all of the commits you made in your local repository you will need to run this command:
git push
Step #6: Learning to Undo/Revert
There may come a time where you may make modifications that you want to undo. Undo boils down to 3 Scenarios:
Scenario #1:
When you want to undo changes done to a particular file since your last commit, you can use the following command:
git checkout --<INSERT FILE/FOLDER NAME>
or
git checkout --a
--a will undo all changes since the last commit
This command above is feasible for small changes done to a file, but if you changed over a 100 lines but dont necessarily want to lose all 100, this command will get rid of all 100. If that's the case you need to commit more often, and use Scenario #2.
Scenario #2:
When you want to move back to a previous commit, you first need to figure out what the ID of the commit you want to go back to is called, you can do that by using the following command:
git log
This will give you a list of all the commits ever done in your local repository. Find the commit ID of the commit you want to go back to and copy it. Once you have it use the following command:
git revert <INSERT COPIED COMMIT ID>
Keep in mind that once you run this command it will automatically move back to that commit and commit one more time in order to move the HEAD pointer to this commit. In order to prevent that from happening if you don't want it to... it really shouldn't matter... but f you want to stop it, use:
git revert -n <INSERT COPIED COMMIT ID>
Scenario #3
When you want to clear your git log of all commits after a particular commit you can use the following command:
git reset --hard <INSERT COPIED COMMIT ID>
The command above will also commit the changes automatically in order to move the HEAD pointer to the new location.
There may come a time where you may make modifications that you want to undo. Undo boils down to 3 Scenarios:
- Undoing changes made since your last commit
- You want to move back to a previous commit
- You have been developing, realize that some of the commits you made a just not useful, so you want to get rid of all commits after a certain commit
Scenario #1:
When you want to undo changes done to a particular file since your last commit, you can use the following command:
git checkout --<INSERT FILE/FOLDER NAME>
or
git checkout --a
--a will undo all changes since the last commit
This command above is feasible for small changes done to a file, but if you changed over a 100 lines but dont necessarily want to lose all 100, this command will get rid of all 100. If that's the case you need to commit more often, and use Scenario #2.
Scenario #2:
When you want to move back to a previous commit, you first need to figure out what the ID of the commit you want to go back to is called, you can do that by using the following command:
git log
This will give you a list of all the commits ever done in your local repository. Find the commit ID of the commit you want to go back to and copy it. Once you have it use the following command:
git revert <INSERT COPIED COMMIT ID>
Keep in mind that once you run this command it will automatically move back to that commit and commit one more time in order to move the HEAD pointer to this commit. In order to prevent that from happening if you don't want it to... it really shouldn't matter... but f you want to stop it, use:
git revert -n <INSERT COPIED COMMIT ID>
Scenario #3
When you want to clear your git log of all commits after a particular commit you can use the following command:
git reset --hard <INSERT COPIED COMMIT ID>
The command above will also commit the changes automatically in order to move the HEAD pointer to the new location.
Congrats you made it!
Alright, that is pretty much all of the basics of GitHub, I hope it all made sense, if not be sure to checkout some other content out there that might be able to explains stuff better. My biggest recommendation is to just use GitBash and the commands, the more you do, the more familiar you will get with the commands. If you forget something just come back to this page and see what commands you need to run. Use this workflow mentioned above for a couple of projects, and in a matter of no time you will be a GitHub Pro!
Best of Luck,
Shawn Victor
Best of Luck,
Shawn Victor